Software

Drafting with Scrivener

The previous blog post generated the following comment:

Quick question if you’re busy putting off book two … Do you use any particular software for your first draft?

Linzi

Since I am still putting off book two (though I hit my word count goal every day last week! 🎉), I thought I’d get into a little more detail than a comment would support. The short answer is that I use Scrivener for all of my drafting, including edits, but if you’d like a peek behind the curtain, read on!

I’m going to use my actual Scrivener file for Polaris Rising, so if you haven’t read the book yet, you may want to do that first. There shouldn’t be too many spoilers, but why wouldn’t you want to read about a badass space princess and an outlaw soldier? ;)

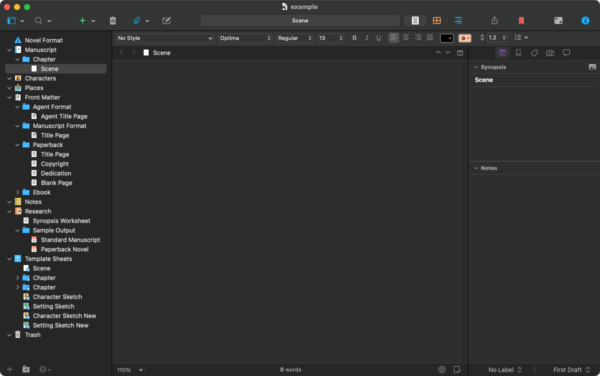
Scrivener has a default project type for novels, which is what my custom template is based on. My template evolves a little bit over time as I find ways to tweak it just so for my writing style, but the basics remain the same as the default template. All of my new projects start out looking like this:

A freshly created empty Scrivener project based on my custom template.
Click to enlarge

One of the things I really like about Scrivener is that text is broken down into scenes. A scene is technically just an arbitrary piece of text—it could be anything—but thinking about them as actual scenes of a book is useful for me, especially for pacing. And scenes can be moved around, split, reordered, and dragged from one chapter to another with ease, which helps when the pacing isn’t quite there and things need to be adjusted.

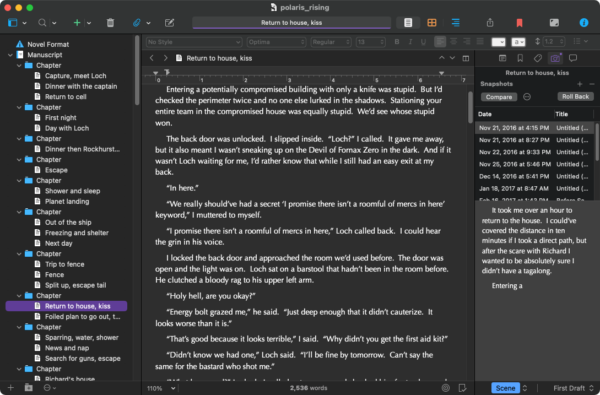
This is what the first nine-ish chapters of PR look like in Scrivener:

The Scrivener project file for Polaris Rising.
Click to enlarge

There’s a lot going on here, so let’s break it down. On the left (called the binder) is a list of the chapters and their various scenes. I give mine short descriptions so I remember what’s in them without having to open each one.

In the middle is the main editor. This is where I spend most of my time, because it’s where the words actually happen. You can see that I’m one of the ancients who still uses two spaces after a period while drafting (but weirdly, only while drafting). Scrivener handily strips them out for me when I export, another perk.

On the right is the inspector which has all of the meta info about the selected scene. Here it’s showing snapshots of the scene’s history. This is another big benefit of Scrivener: version history. Just like git for code, Scrivener can keep a history of your documents, so if you make a big change and decide you hate it, you have the original. You have to set it up (mine snapshots changes on every manual save), but it’s a nice feature. Before I do any edits, I make a titled snapshot of the whole manuscript so I can roll back if I need to.

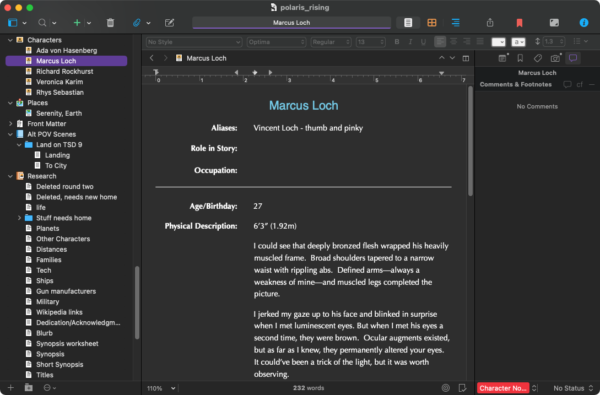
Scrivener can also hold all of the information about a project, not just the manuscript itself. So all of my notes and research can go right in the file, keeping everything together. Here is part of the research and notes section for PR:

The character and notes section of Polaris Rising's Scrivener file, with Marcus Loch's character sheet open.
Click to enlarge

Here you can see I keep character sheets for my main characters, as well as place descriptions and tons and tons of notes. Mostly my character sheets are just places I dump description as I write it, so I don’t accidentally change their hair or eye color, but it also keeps some personality info and other things important to keeping their progression consistent throughout the book.

The research section is where everything else goes. I keep a list of minor characters so everyone doesn’t share the same name, or the same starting letter. Apparently I love some letters more than others, so I have to watch it.

When I start the second book in a series, I’ll copy over all of my character sheets, location details, and research from the first book, then keep adding to it. This helps with continuity and means I don’t have to keep pulling up the first book to check minor details.

The last thing Scrivener really shines at is exporting your text into various formats. Publishing runs on Microsoft Word, so I export to Word in the standard manuscript format (Times New Roman 12, double-spaced) before sending the draft off to my editor. As I said before, Scrivener strips out all of my extra spaces as part of the export, saving me a find and replace step.

When edits arrive, I keep Word open with my editor’s feedback and make the changes directly in Scrivener, then do a clean export of the edited draft. Copyedits are a little trickier, because all of the changes have to be made directly in the Word file, but I duplicate the changes in Scrivener, so my saved draft matches the copyedited text. Same for changes made to the galley pages. When I’m done, my Scrivener project exactly matches the final text in the book.

Scrivener can also export directly to the various ebook formats, which is great for getting the book into the hands of my early readers, as well as output in a HTML format that is compatible with the blog, so I don’t lose italics when I post snippets. And you can set up custom formats that are shared across projects, so the output is always formatted exactly how you want.

All of this flexibility is one of the reasons Scrivener tends to have a very high learning curve. I didn’t even get into a fraction of the features, but I don’t use a lot of them because I usually draft from start to finish, so I don’t need to see my outline or corkboard or any of the other million little things Scrivener supports. Finding the way that works for you is one of the biggest challenges of using Scrivener.

I’ve been using it since 2008, have written seven published (or to-be-published) books, one trunked novel, and countless partials with it, and I still find things I didn’t know about. But if you have any questions, drop me a comment and I’ll do my best to answer. :)

Happy writing!
Customizing the Editor in Fugu

When I changed hosts for my blog, it also meant that I could no longer just SMB the files around. I had to find an actual SFTP/SCP-client for my Macbook. A quick Google search turned up Cyberduck and Fugu. I arbitrarily chose Fugu. (Turns out this was the right decision. Dustin convinced me to try Cyberduck; version 2.6.1 crashed three times in a row while I was trying to type in the hostname. But I digress…)

Fugu is pretty slick, but it would only open files for editing using one of the preset editors, none of which I had. I decided to see if I could change the list of available editors to include TextEdit, since I was only editing basic CSS.

Turns out you can. Here’s how.

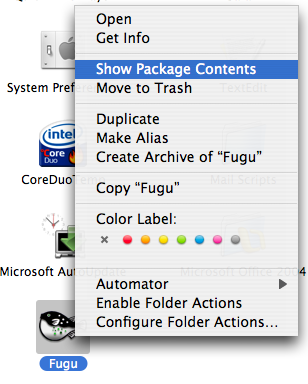
1. Right click on the Fugu application and choose “Show Package Contents”

picture_1.png

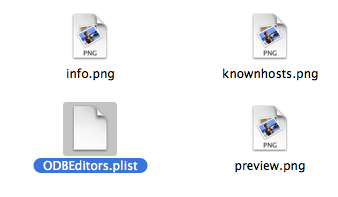
2. Navigate to Contents, Resources, ODBEditors.plist

picture_2.png

3. Open the ODBEditors.plist file in TextEdit. Scroll to the bottom of the file and either create a new entry or modify one of the existing entries. I modified the emacs entry, since I don’t plan on ever using it. You can copy and paste the following into the file:

Updated text version thanks to Rich:

<dict>
    <key>ODBEditorBundleID</key>
    <string>com.apple.TextEdit</string>
    <key>ODBEditorCreatorCode</key>
    <string>ttxt</string>
    <key>ODBEditorLaunchStyle</key>
    <integer>0</integer>
    <key>ODBEditorName</key>
    <string>TextEdit</string>
</dict>


Original post text version:

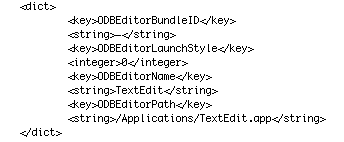
<dict>
    <key>ODBEditorBundleID</key>
    <string>-</string>
    <key>ODBEditorLaunchStyle</key>
    <integer>0</integer>
    <key>ODBEditorName</key>
    <string>TextEdit</string>
    <key>ODBEditorPath</key>
    <string>/Applications/TextEdit.app</string>
</dict>

Original post image version:
picture_3.png

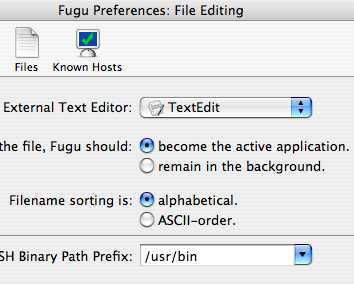
4. Save the file and you’re good. Load up Fugu, click Fugu, Preferences. In the preference pane, click the Files icon. In the External Text Editor, choose the name of the editor you just created. In my case, TextEdit.

picture_4.png

Viola! You can now command-J to edit files with your chosen editor from Fugu.

iTunes Update

For those of you who use iTunes, version 4.5 is now available. It has several new features and now you can download a free single from an “emerging artist” every week. It seems like this update is made up of a bunch of small things that ellict a “that’s kinda cool” response, instead of a few “WOW” features. For example it’s kinda cool that you can watch movie trailers straight from iTunes (and of course buy the soundtracks and audiobooks). It’s also kinda cool that you can watch music videos. I’m not really a music video fan but I watched a couple and it was sorta nice, but not something I would really miss if it wasn’t available.

One new feature that is pretty useful is the improved printing options. Now you can print a list of your songs, or a list of all the albums you have. You can also print cd covers with actual album art (or a mosiac of all the covers for a mixed cd). I don’t really ever burn discs, but if I did, I think this is a really cool feature. I’m thinking about making a mix cd just to test it out. :)

All of the audiophiles out there will probably be happy with the new Apple Lossless Encoder, which promises full CD quality audio in about half the size an uncompressed audio file would require. This would also probably be a good option to back up CDs onto your computer without a loss in quality.

If you go to the iTunes site you can read about all of the other features I didn’t cover like: Radio Charts, iMix, Wish List, and now your library has links back to the music store as well.

The Little Driver That Could

I have a Powerbook G4 and I love it. I wouldn’t trade it for any of the Windows notebooks in the world. However, there is one teensy, tiny little thing I envy about all of those behemoth Windows notebooks–the built in scrolling on the trackpad. Just run your finger down one side of the trackpad, and voila! scrolling like magic. Now, I don’t need to be envious any longer because I found a driver for OS X that does the same thing and a whole lot more (ok, so really Dustin found it).

Before I go any further I must warn you that this software is BETA! If you don’t know what that means, don’t install it. Simple as that. The software is known as SideTrack and it is currently at version 0.8.
http://www.ragingmenace.com/software/sidetrack/index.html
http://www.macupdate.com/info.php/id/12800

Installation. Installation was fast, just run the program you download. However, when I rebooted the fist time, I didn’t think my computer was going to boot. It took a LONG time to move from the grey screen. Don’t worry, it booted normally the next time I restarted. When you finally get it rebooted, tapping the trackpad is turned off by default. Go to System Preferences and at the bottom you’ll see the SideTrack button. Then configure away. This driver has a LOT of features. Go to the link above for a good list of everything it does. I’ll just cover the features I found most useful.

Scrolling. You can set up the scroll area to be either on the left or right of the trackpad and you can set the width of the scrolling area. It takes a while to get used to the scrolling and where exactly you need touch the trackpad to get it to work. If you set the area wider it may help you get used to it. After using it for a week I can pretty much always hit the correct area. You can also set up horizontal scrolling but since I rarely need to scroll left and right, I haven’t set it up.

The button. You can set the mouse button to be either a right or left mouse click. At first I set it up as a right click, since I mostly tap the trackpad to left click (if you intend to keep it this way, you need to set the tap to “left click with drag“ or you won’t be able to move windows or select text). However, after using that button as a left click for over a year, I found it was just too hard to retrain myself to see it as a right click. So, I changed it back and found a different solution for right clicking.

Corners. You can set the corners to be a left or right click, or a keystroke, or other options. So, for right clicking, I set the top left corner to a right click. It takes some practice to find exactly where you need to tap, but you can always make the area bigger and I like it better than Ctrl clicking.

Ok, that’s what I like about it. There is really only one thing I can complain about–sometimes your mouse will freeze for a second or two. Not really too annoying but you will notice it. Overall, though, it’s very, very cool. And the thing I love the most? You can set it to let you tap to select the user to login. I never understood why tapping didn’t work in the fist place.